Friday, March 29, 2019

Part I : Understanding basics of Fasterxml Jackson


Hello, friends today in this blog we will be learning about the JSON processing in java using "Fasterxml Jackson Library". This library can handle many JSON processing operation like add a node, update the existing node, delete the node from JSON. Serialize java object to JSON and Deserialize back to Java Objects.

We will be covering below things in this tutorial
  1. Add, Update, Delete Node from JSON
  2. Serialize java object to JSON
  3. Deserialize to java object from JSON
  4. Deserialize to java object when there is no default constructor
  5. Ignoring fields completely while De/serialization
  6. Ignoring fields if it is null while serialization
  7. Ignoring unknown fields in JSON

Before we start you need to import below dependency in your project. am using Gradle for dependency management.
dependencies {
   compile group: 'com.fasterxml.jackson.core', name: 'jackson-core', version: '2.9.8'
   compile group: 'com.fasterxml.jackson.core', name: 'jackson-databind', version: '2.9.8'
   compile group: 'com.fasterxml.jackson.core', name: 'jackson-annotations', version: '2.9.8'  
}


1. Add, Update Delete Node from JSON
Let's look at below example of List of Students with their age and grade. We will be performing the Add, Update and Delete operation on the JSON.
// This is our JSON on which we are going to perform operation
String jsonRep = "{ \"studentList\" : [" +
"{\"name\" : \"robort\", \"age\" : 9, \"grade\" :  \"A+\"}," +
"{\"name\" : \"mili\", \"age\" : 10, \"grade\" :  \"A\" }," +
"{\"name\" : \"jack\", \"age\" : 10, \"grade\" :  \"B+\"}]}";

// Create ObjectMapper object
ObjectMapper mapper = new ObjectMapper();
ObjectReader reader = mapper.reader();

// Represent JSON Element or JSON Array
JsonNode node = reader.readTree(jsonRep);

// For JSON Arrays use ArrayNode class
ArrayNode list = (ArrayNode) node.get("studentList");

// For JSON Element use Object Node class
ObjectNode newNode = mapper.createObjectNode();

// Add properties of JSON Element
newNode.put("name", "test");
newNode.put("age", 11);
newNode.put("grade", "A");
list.add(newNode);

System.out.println("New Node Added.");
System.out.println(node);

ObjectNode robortNode = (ObjectNode) list.get(0);
// Update existing property for the JSON element
robortNode.put("age", 10);

System.out.println("Robort Age is update");
System.out.println(node);

list.remove(1);
System.out.println("Mili's record removed");
System.out.println(node);

Output:-
New Node Added.
{"studentList":[{"name":"robort","age":9,"grade":"A+"},{"name":"mili","age":10,"grade":"A"},{"name":"jack","age":10,"grade":"B+"},{"name":"test","age":11,"grade":"A"}]}
Robort Age is update
{"studentList":[{"name":"robort","age":10,"grade":"A+"},{"name":"mili","age":10,"grade":"A"},{"name":"jack","age":10,"grade":"B+"},{"name":"test","age":11,"grade":"A"}]}
Mili's record removed
{"studentList":[{"name":"robort","age":10,"grade":"A+"},{"name":"jack","age":10,"grade":"B+"},{"name":"test","age":11,"grade":"A"}]}


2. Serialize java object to JSON
This is the most common scenario when we need to serialize the Java object to JSON so that it can be transferred over HTTP or plain text-based protocol and from the other end re-assembled to the java object.
// This is employee object which we need to serialize to JSON
Employee e1 = new Employee();
e1.setId(1);
e1.setName("Mr. Robort bond");
e1.setCity("Pune");
e1.setDesignation("Manager");

// Creating ObjectMapper instance
ObjectMapper mapper = new ObjectMapper();

// Enable indented output of JSON
mapper.enable(SerializationFeature.INDENT_OUTPUT);

String jsonString;
try {
 jsonString = mapper.writeValueAsString(e1);
 System.out.println(jsonString);
} catch (JsonProcessingException e) {
 e.printStackTrace();
 System.out.println("Could Not Prepare JSON String");
}

Output:
{
  "id" : 1,
  "name" : "Mr. Robort bond",
  "designation" : "Manager",
  "city" : "Pune"
}


3. Deserialize to java object from JSON
Here we are constructing the Java object from JSON. This is the plain scenario like your java class is plain POJO class having a default constructor. We will see some more complicated example the in next example.
// Here is our source JSON
String json = "{ \"id\" : 1, \"name\" : \"Mr. Robort bond\", "+
 " \"designation\" : \"Manager\", \"city\" : \"Pune\"}";
ObjectMapper mapper = new ObjectMapper();
try {
 // We will be using readValue method to parse the JSON to java object
 Employee emp = mapper.readValue(json, Employee.class);
 System.out.println("Employee Object :");
 System.out.println(emp.toString());
} catch (IOException e) {
 e.printStackTrace();
 System.out.println("Could Not Construct Object");
}

Output :
Employee Object :
Employee [id=1, name=Mr. Robort bond, designation=Manager, city=Pune]


4. Deserialize to java object when there is no default constructor
There are some specific conditions when we don't have a default constructor to the class, instead of that we have public parameterized constructor. In some condition, we have a private default constructor and we have a static factory method which will create the of the class for you. In such cases, Jackson will not able to create the instance of your class and it will throw below error

com.fasterxml.jackson.databind.exc.InvalidDefinitionException: Cannot construct instance of `blog.javahotfix.jacksondemo.entity.MyFile` (no Creators, like default construct, exist): cannot deserialize from Object value (no delegate- or property-based Creator) at [Source: XXXXX . . . .

So in the below code snippet, we will be covering these kinds of example.
import com.fasterxml.jackson.annotation.JsonCreator;
import com.fasterxml.jackson.annotation.JsonProperty;

public class MyFile {
 private String name;
 private String path;
 private int size;
 
 @JsonCreator
 public MyFile(
   @JsonProperty("name") String name, 
   @JsonProperty("path") String path,
   @JsonProperty("size") int size) {
  
  this.name = name;
  this.path = path;
  this.size = size;
 }
 
 /* GETTER AND SETTERS FOR THE FIELDS */

 @Override
 public String toString() {
  return "MyFile [name=" + name + ", path=" + path + 
   ", size=" + size + "]";
 }
}

public class MyFileV2 {
 private String name;
 private String path;
 private int size;
 
 @JsonCreator
 public static MyFileV2 createInstance(
   @JsonProperty("name") String name,
   @JsonProperty("path") String path, 
   @JsonProperty("size") int size) {
  MyFileV2 obj = new MyFileV2(name, path, size);
  return obj;
 }
 
 private MyFileV2(String name, String path, int size) {
  super();
  this.name = name;
  this.path = path;
  this.size = size;
 }

 /* GETTER AND SETTERS FOR THE FIELDS */

 @Override
 public String toString() {
  return "MyFile [name=" + name + ", path=" + path + ", size=" + size
    + "]";
 }
}


public class JsonToJava2 {
 public static void main(String args[]) {
  
  String json = 
     "{ \"name\" : \"myfile1.txt\", " +
     " \"path\" : \"/install/javahotfix/files\", " +
     " \"size\" : 1024 }";
  
  ObjectMapper mapper = new ObjectMapper();
  
  try {
   MyFile file = mapper.readValue(json, MyFile.class);
   System.out.println("My File : ");
   System.out.println(file);

   MyFileV2 file2 = mapper.readValue(json, MyFileV2.class);
   System.out.println("My File v2 :");
   System.out.println(file2);
  } catch (IOException e) {
   System.out.println("Unable to Parse JSON");
   e.printStackTrace();
  }
  
 }
}
Output :
My File : 
MyFile [name=myfile1.txt, path=/install/javahotfix/files, size=1024]
My File v2 :
MyFile [name=myfile1.txt, path=/install/javahotfix/files, size=1024]


5. Ignoring fields completely while De/serialization
There are many cases where our representation class contains some internal processing flags or data that we don't want to pass through the serialization or don't want to take into the system through deserialization. To ignore such fields we can use the @JsonIgnore annotation provided by the Jackson. This annotation will tell to the Jackson to skip the field during De/serialization. Let's look at the below example.

import com.fasterxml.jackson.annotation.JsonIgnore;

public class Fruit {
 private int id;
 private String name;
 private double ratePerKg;
 
 // some internal processing parameters
 @JsonIgnore
 private int storageRackNumber;
 
 @JsonIgnore
 private boolean readyToSell;
 
 /* GETTER AND SETTERS */
 
 @Override
 public String toString() {
  return "Fruit [id=" + id + ", name=" + name + 
   ", ratePerKg=" + ratePerKg + 
   ", storageRackNumber=" + storageRackNumber + 
   ", readyToSell=" + readyToSell + "]";
 }
}

import com.fasterxml.jackson.core.JsonProcessingException;
import com.fasterxml.jackson.databind.ObjectMapper;
import com.fasterxml.jackson.databind.SerializationFeature;

public class JsonIgnoreField {
public static void main(String args[]) { 
 Fruit apple = new Fruit();
 apple.setId(1);
 apple.setName("Apple");
 apple.setRatePerKg(120.00);
 apple.setStorageRackNumber(24);
 apple.setReadyToSell(false);
 
 ObjectMapper mapper = new ObjectMapper();
 mapper.enable(SerializationFeature.INDENT_OUTPUT);
 
 try {
  String jsonRep = mapper.writeValueAsString(apple);
  System.out.println("Apple instance :");
  System.out.println(jsonRep);
 } catch (JsonProcessingException e) {
  System.out.println("Unable to parse the object to JSON");
  e.printStackTrace();
 }
 
 String json = "{ \"id\" : 1, \"name\" : \"Mango\", " +
 " \"ratePerKg\" : 160.0 ,\"storageRackNumber\" : 22 }";

 try {
  Fruit mango = mapper.readValue(json, Fruit.class);
  System.out.println("Mango Instance :");
  System.out.println(mango);
 } catch (IOException e) {
  System.out.println("Unable to parse the object to JSON");
  e.printStackTrace();
 }
}
}

Output :
Apple instance :
{
  "id" : 1,
  "name" : "Apple",
  "ratePerKg" : 120.0
}
Mango Instance :
Fruit [id=1, name=Mango, ratePerKg=160.0, storageRackNumber=0, readyToSell=false]


6. Ignoring fields if it is null while serialization
When we serialize java object, by default it put all the fields to JSON whether the values are null or not. If we want to exclude the fields from serialization if they are null, then we can enable this feature by adding annotation over source class to include only not null values. let's look at the below example
import com.fasterxml.jackson.annotation.JsonInclude;
import com.fasterxml.jackson.annotation.JsonInclude.Include;

@JsonInclude(value=Include.NON_NULL)
public class Fruit {
 private int id;
 private String name;
 private double ratePerKg;
 private List seasons;
 
 /* GETTERS AND SETTERS */
}

import java.io.IOException;
import java.util.Arrays;

import com.fasterxml.jackson.core.JsonProcessingException;
import com.fasterxml.jackson.databind.ObjectMapper;
import com.fasterxml.jackson.databind.SerializationFeature;

import blog.javahotfix.jacksondemo.entity.Fruit;

public class JsonIgnoreField {
 public static void main(String args[]) {
  
  Fruit apple = new Fruit();
  apple.setId(1);
  apple.setName("Apple");
  apple.setRatePerKg(120.00);
  apple.setSeasons(Arrays.asList("Winter", "Summer"));
  
  Fruit mango = new Fruit();
  mango.setId(2);
  mango.setName("Mango");
  mango.setRatePerKg(160.00);
  
  ObjectMapper mapper = new ObjectMapper();
  mapper.enable(SerializationFeature.INDENT_OUTPUT);
  
  try {
   String jsonRepApple = mapper.writeValueAsString(apple);
   System.out.println("Apple instance :");
   System.out.println(jsonRepApple);
   
   String jsonRepMango = mapper.writeValueAsString(mango);
   System.out.println("Mango instance :");
   System.out.println(jsonRepMango);
  } catch (JsonProcessingException e) {
   System.out.println("Unable to parse the object to JSON");
   e.printStackTrace();
  }
 }
}


Output :
Apple instance :
{
  "id" : 1,
  "name" : "Apple",
  "ratePerKg" : 120.0,
  "seasons" : [ "Winter", "Summer" ]
}
Mango instance :
{
  "id" : 2,
  "name" : "Mango",
  "ratePerKg" : 160.0
}


7. Ignoring unknown fields in JSON
If you are Deserializing the JSON to java object & if the unknown properties come through the JSON, then the Deserialization fail. This is the default nature of Jackson.

com.fasterxml.jackson.databind.exc.UnrecognizedPropertyException: Unrecognized field "unknownProp" (class XXX.XXX), not marked as ignorable (2 known properties: "id", "name"])  at [ Source: (String)"{ "id" : 1, "name" : "Mango" , "unknownProp" : "bla bla" }"; line: 1, column: 49] (through reference chain:...... 

If you want to configure the things like it will simply ignore unknown property then you can configure like in the below example.

public class Fruit {
 private int id;
 private String name;
 
 /* GETTERS AND SETTERS*/ 

 @Override
 public String toString() {
  return "Fruit [id=" + id + ", name=" + name + "]";
 }
}

import blog.javahotfix.jacksondemo.entity.Fruit;
import java.io.IOException;
import com.fasterxml.jackson.databind.DeserializationFeature;
import com.fasterxml.jackson.databind.ObjectMapper;

public class JsonIgnoreField {
 public static void main(String args[]) {
  
  String json = "{ \"id\" : 1, " + 
    " \"name\" : \"Mango\" , " +
    " \"unknownProp\" : \"bla bla\" }";
  
  ObjectMapper mapper = new ObjectMapper();
  mapper.disable(DeserializationFeature.FAIL_ON_UNKNOWN_PROPERTIES);
  
  try {
   Fruit mango = mapper.readValue(json, Fruit.class);
   System.out.println("Mango Object \n" + mango);
  } catch (IOException e) {
   System.out.println("Unable to parse the object to JSON");
   e.printStackTrace();
  }
 }
}


Output :
Mango Object 
Fruit [id=1, name=Mango]


Well, we come to the end of this blog, Jackson is a very big topic but to get started with it, this blog will help you. I will be writing more blogs on advance Jackon concept. Stay tuned ! ! !

Till then
Good Bye and Happy Coding ! ! ! !

Sunday, March 24, 2019

Versioning in REST API


Hello Friends, Welcome to my blog. Today our topic for discussion is versioning in REST API. We will be using the spring-boot application to demonstrate versioning whereas REST API Versioning is a Theoretical Concept or I would say a kind of design pattern which solves the industry problem. It is a technology independent and you can apply this pattern with any other REST API development frameworks. Let's get started then !!!

A bit history of a problem to understand the need for versioning
Before digging into the concept, let's understand why versioning. Suppose you have a product, and you are providing services to your clients on software as a service basis. your clients had integrated your REST APIs to their software & mobile application. Now after years you have come across a situation, where one of your client "Mr. X" requesting some enhancement of API Contract in the existing feature, but at the same time, the changes would break the already in place integration for the customer "Mr. A".

How would you handle this situation? The answer is versioning. You need 2 different version of the same REST API. one is old which is already used by "Mr. A" & another V2 is for "Mr. X" where they are requesting new features.

Ways of versioning
There are many ways by which you can archive versioning in your REST Apis. Out which we will be discussing 2 of them.

  • Custom Content Type
  • Using Version number in URI

Above 2 approaches are widely adopted in the industry. there are good benefits of using those pattern. versioning comes with the cost of code complexity. Your approach should be such that you should be able to maintain both version of the code with ease, minimum effort, and less mess. Let's have a close look at both of them.

Versioning through Custom Content Type
In this technique of versioning, we will be creating a new media type for each representation of the version of an entity. It will be passed through the header "content-type" & "Accept" depending up the operation type GET, POST, PUT, HEAD. 

Example for old customer representation media-type will be "application/vnd.javahotfix.customer.v1+json" and for the newly updated contract for the customer entity could be represented by media-type "application/vnd.javahotfix.customer.v2+json". 

With this change, old clients could call our REST API through v1 media-type and the new client can call our REST API through v2 media-type. We will be covering this in our example below.

Versioning using URI
In this technique, we will be using a URI such way that it includes the version number in it. once we need changes in the contract, we will keep the old as it is and will create new REST API and assigning a new version number in the URI. 

For example, to get the old representation of the customer entity we will give a REST call to the API in like "GET http://something.xyz/v1/customer/1234". To get the new representation of the customer entity one can call "GET http://something.xyz/v2/customer/1234".

Let's take a look at the below code snippet. We are storing the customer entity in our repository. This was our initial version of the code.

Existing system design
// Customer Representation object which will be the end user contract
public class CustomerRep {
 private int id;
 private String name;
 private String city;
 private String status;
 
 //getter and setters for above fields
}

// Customer DTO Object which will be stored in Database
public class CustomerDto {
 private int id;
 private String name;
 private String city;
 private String status;
 
 //getter and setters for above fields
}

// Controller which will take care of GET and POST Methods
@Controller
public class CustomerController {

 @Autowired
 private CustomerRepository repo;
 
 @RequestMapping(value="/customer",method=RequestMethod.POST,
   consumes={"application/json"})
 public ResponseEntity create(@RequestBody CustomerRep rep) {
  CustomerDto dto = CustomerConverter.convertToDto(rep);
  repo.save(dto);
  
  CustomerRep rt = CustomerConverter.convertToRep(dto);
  return new ResponseEntity(rt, HttpStatus.CREATED);
 }
 
 @RequestMapping(value="/customer/{id}",method=RequestMethod.GET, 
   produces={"application/json"})
 public ResponseEntity getCustomerRepV1(@PathVariable(name="id") int id) {
  
  CustomerDto dto = repo.get(id);
  CustomerRep rep =  CustomerConverter.convertToRep(dto);
  return new ResponseEntity(rep, HttpStatus.OK);
 }
} 


Based on the above coding snippets, now we want to enhance the customer entity.

  • Support 2 new fields email address which is a mandatory filed and contact number. 
  • Make sure that our old endpoint remains working as it is as it was earlier because they might be integrated with many other systems and changing to API will break many things.
  • Create new API which will support this new representation of customer entity.

So let's have a look at the first approach of custom media-type. from below snippet, you can get to know how this technique will help us for archiving above requirement/versioning.


Example for Versioning Using Custom Media Type
// Customer Representation object which will be the end user contract
public class CustomerRep {
 private int id;
 private String name;
 private String city;
 private String status;
 
 //getter and setters for above fields
}

// Customer Representation object for V2 Version 
public class CustomerV2Rep extends CustomerRep {
 private String emailAddress;
 private String contactNumer;
 
 // getter and setters
}

// Customer DTO Object which will be stored in Database
public class CustomerDto {
 private int id;
 private String name;
 private String city;
 private String status;
 private String emailAddress; // new filed added in database
 private String contactNumber; // new filed added in database
 
 //getter and setters for above fields
}

public class CustomerConverter {
 public static CustomerDto convertToDto(CustomerRep rep1) {
  CustomerDto dto = new CustomerDto();
  dto.setId(rep1.getId());
  dto.setCity(rep1.getCity());
  dto.setName(rep1.getName());
  dto.setStatus(rep1.getStatus());
  
  // Setting not applicable defaults value to new Parameter 
  // added as part of V2 of customer
  dto.setEmailAddress("NA");
  dto.setContactNumber("NA");
  return dto;
 }
 
 public static CustomerDto convertToDto(CustomerV2Rep rep1) {
  CustomerDto dto = new CustomerDto();
  dto.setId(rep1.getId());
  dto.setCity(rep1.getCity());
  dto.setName(rep1.getName());
  dto.setStatus(rep1.getStatus());
  dto.setEmailAddress(rep1.getEmailAddress());
  dto.setContactNumber(rep1.getContactNumer());
  return dto;
 }
 
 public static CustomerRep convertToRep(CustomerDto dto) {
  CustomerRep rep = new CustomerRep();
  rep.setId(dto.getId());
  rep.setCity(dto.getCity());
  rep.setName(dto.getName());
  rep.setStatus(dto.getStatus());
  return rep;
 }
 
 public static CustomerV2Rep convertToRepV2(CustomerDto dto) {
  CustomerV2Rep rep = new CustomerV2Rep();
  rep.setId(dto.getId());
  rep.setCity(dto.getCity());
  rep.setName(dto.getName());
  rep.setStatus(dto.getStatus());
  rep.setEmailAddress(dto.getEmailAddress());
  rep.setContactNumer(dto.getContactNumber());
  return rep;
 }
 
}

// Controller which will take care of GET and POST Methods
@Controller
public class CustomerController {

 @Autowired
 private CustomerRepository repo;
 
 // Create customer object with V1 or default version of the entity
 @RequestMapping(value="/customer",method=RequestMethod.POST,
   consumes={"application/vnd.customer.api.v1+json",
   "application/json"})
 public ResponseEntity create(@RequestBody CustomerRep rep) {
  CustomerDto dto = CustomerConverter.convertToDto(rep);
  repo.save(dto);
  
  CustomerRep rt = CustomerConverter.convertToRep(dto);
  return new ResponseEntity(rt, HttpStatus.CREATED);
 }
 
 
 // Create customer object with V2 version of the customer entity
 @RequestMapping(value="/customer",method=RequestMethod.POST, 
   consumes={"application/vnd.customer.api.v2+json"})
 public ResponseEntity createV2(@RequestBody CustomerV2Rep rep) {
  
  // validate new attribute
  if(rep.getEmailAddress() == null) {
   return new ResponseEntity (
    new Exception(
     "Email address is madanatory for customer"),
     HttpStatus.BAD_REQUEST );
  }
  
  CustomerDto dto = CustomerConverter.convertToDto(rep);
  repo.save(dto);
  
  CustomerV2Rep rt = CustomerConverter.convertToRepV2(dto);
  return new ResponseEntity(rt, HttpStatus.CREATED);
 }
 

 // Get the V1 or default Version of the Customer entity
 @RequestMapping(value="/customer/{id}",method=RequestMethod.GET, 
   produces={"application/vnd.customer.api.v1+json",
    "application/json"})
 public ResponseEntity getCustomerRepV1(@PathVariable(name="id") int id) {
  
  CustomerDto dto = repo.get(id);
  CustomerRep rep =  CustomerConverter.convertToRep(dto);
  return new ResponseEntity(rep, HttpStatus.OK);
 } 
 
 
 // Get the V2 version of the customer entity
 @RequestMapping(value="/customer/{id}",method=RequestMethod.GET,
   produces={"application/vnd.customer.api.v2+json"})
 public ResponseEntity getCustomerRepV2(@PathVariable(name="id") int id) {
  CustomerDto dto = repo.get(id);
  CustomerV2Rep rep =  CustomerConverter.convertToRepV2(dto);
  return new ResponseEntity(rep, HttpStatus.OK);
 }
 
} 

Here is the summery for the above code snippet.

  • CustomerRep is the primary customer entity representation.
  • We have created new Class extending above class named CustomerV2Rep
  • CustomerV2Rep represent the customer with new attributes
  • CustomerDto is updated for newly required fields
  • We have written DTO to REP Converter for Customer having all static methods. this allows us to convert the DTO to both versions of REPS.
  • In controller class, we have create() & createV2() methods which create the customer entity in the database.
  • create() method is default one which can consume content type of application/json and application/vnd.customer.api.v1+json
  • createV2() is the new method which is consume newer version of customer ie. application/vnd.customer.api.v2+json
  • similar for GET methods, we have 2 version each of them produces the  old and new version of entity i.e. application/vnd.customer.api.v1+json, application/vnd.customer.api.v2+json


I have executed a few flows for above and below is the result
$ curl -s --request POST \
 --header "Content-type:application/json" \
 --data '{ "id" : 1, "name" : "Anil", "city" : "pune", "status" : "active" }' \
 http://localhost:8080/customer
{"id":1,"name":"Anil","city":"pune","status":"active"}

$ curl -s --request POST \
 --header "Content-type:application/vnd.customer.api.v1+json" \
 --data '{ "id" : 2, "name" : "Scott", "city" : "Mumbai", "status" : "active" }' \
 http://localhost:8080/customer
{"id":2,"name":"Scott","city":"Mumbai","status":"active"}

$ curl -s --request POST \
 --header "Content-type:application/vnd.customer.api.v2+json" \
 --data '{ "id" : 3, "name" : "tiger", "city" : "Mumbai", "status" : "active" }' \
 http://localhost:8080/customer
{....removed..unnecessary..content.., "localizedMessage":"Email address is madenatory for customer", "message":"Email address is madanatory for customer","suppressed":[]}
 
$ curl -s --request POST \
 --header "Content-type:application/vnd.customer.api.v2+json" \
 --data '{ "id" : 3, "name" : "tiger", "city" : "Mumbai", "status" : "active", "emailAddress" : "tiger@gmail.com" , "contactNumer" : "+91-9876543210" }' \
 http://localhost:8080/customer
{"id":3,"name":"tiger","city":"Mumbai","status":"active","emailAddress":"tiger@gmail.com","contactNumer":"+91-9876543210"}

$ curl -s --request GET \
 --header "Accept:application/vnd.customer.api.v2+json" \
 http://localhost:8080/customer/1
{"id":1,"name":"Anil","city":"pune","status":"active","emailAddress":"NA","contactNumer":"NA"}

$ curl -s --request GET \
 --header "Accept:application/vnd.customer.api.v2+json" \
 http://localhost:8080/customer/3
{"id":3,"name":"tiger","city":"Mumbai","status":"active","emailAddress":"tiger@gmail.com","contactNumer":"+91-9876543210"}

$ curl -s --request GET \
 --header "Accept:application/vnd.customer.api.v1+json" \
 http://localhost:8080/customer/1
{"id":1,"name":"Anil","city":"pune","status":"active"}

$ curl -s --request GET \
 --header "Accept:application/vnd.customer.api.v1+json" \
 http://localhost:8080/customer/3
{"id":3,"name":"tiger","city":"Mumbai","status":"active"}

$ curl -s --request GET  http://localhost:8080/customer/3
{"id":3,"name":"tiger","city":"Mumbai","status":"active"}


Example of Versioning through URI
So in this approach, everything remains the same as above only our controller class will change. We will be using one class perversion strategy. Have a look at below controller classes & you will come to know how we can implement this.
@Controller
public class CustomerControllerURI {

 @Autowired
 private CustomerRepository repo;

 // Create V1 or default version of the customer entity
 @RequestMapping(value={"customer", "v1/customer"}, method=RequestMethod.POST)
 public ResponseEntity create(@RequestBody CustomerRep rep) {
  CustomerDto dto = CustomerConverter.convertToDto(rep);
  repo.save(dto);

  CustomerRep rt = CustomerConverter.convertToRep(dto);
  return new ResponseEntity(rt, HttpStatus.CREATED);
 }

 // Get the V1 or default Version of the Customer entityentity
 @RequestMapping(value={"customer/{id}", "v1/customer/{id}"},method=RequestMethod.GET)
 public ResponseEntity getCustomerRepV1(@PathVariable(name="id") int id) {
  CustomerDto dto = repo.get(id);
  CustomerRep rep =  CustomerConverter.convertToRep(dto);
  return new ResponseEntity(rep, HttpStatus.OK);
 } 

}

@Controller
public class CustomerControllerURIV2 {
 @Autowired
 private CustomerRepository repo;
 
 // Create V2 version of the customer entity
 @RequestMapping(value="v2/customer",method=RequestMethod.POST)
 public ResponseEntity createV2(@RequestBody CustomerV2Rep rep) {

  // validate new attribute
  if(rep.getEmailAddress() == null) {
   return new ResponseEntity (
   new Exception("Email address is madanatory for customer"),
   HttpStatus.BAD_REQUEST );
  }

  CustomerDto dto = CustomerConverter.convertToDto(rep);
  repo.save(dto);

  CustomerV2Rep rt = CustomerConverter.convertToRepV2(dto);
  return new ResponseEntity(rt, HttpStatus.CREATED);
 }

 // Get the V2 version of the customer entity
 @RequestMapping(value="v2/customer/{id}",method=RequestMethod.GET)
 public ResponseEntity getCustomerRepV2(@PathVariable(name="id") int id) {
  CustomerDto dto = repo.get(id);
  CustomerV2Rep rep =  CustomerConverter.convertToRepV2(dto);
  return new ResponseEntity(rep, HttpStatus.OK);
 }
}


I hope you have understood both the patterns well. please share your feedback, question in the comment section below. I will definitely try to address your queries.

Thanks
Happy Coding and have a wonderful day !!!

Sunday, March 17, 2019

JDB | Using Java Command Line Debugging Tool


Hello Friends, Welcome to my blog. Today in this blog we will be learning one of the tools provided by Java for the application debugging & inspection known as JDB. It is the command line tool which allows debugging local or remote java application. many developments tools like Eclipse, NetBeans uses JDB internally to debug remote or local the application.

  • JDB is a java command line debugging tool
  • It can debug local as well as the remote java application
  • It ships by default with JDK in the bin directory
  • You can use this tool if the debugging is enabled on a remote java application server, but the debugging port is not opened over internet/intranet due to security constraints and you have ssh access to the server or the jump host.
  • This tool has a rich set of commands which is enough to troubleshoot your problem.

So let's get our hand dirty and connect to already running application on the local server. I have added the Java debugging parameter before running my application. My spring boot application is running on localhost:8080 and debug port is 8001.

Since my application is local, am using the only port to connect. if you have a remote application, you can provide IP: Port from the jump box/bastion server. 

Connect Command
[root@localhost anilsable]# jdb -attach 8001
Set uncaught java.lang.Throwable
Set deferred uncaught java.lang.Throwable
Initializing jdb ...
> 


Help Command, You will get Complete List of Supportable operations in JDB
> help
** command list **
connectors                -- list available connectors and transports in this VM

run [class [args]]        -- start execution of application's main class

threads [threadgroup]     -- list threads
thread         -- set default thread
suspend [thread id(s)]    -- suspend threads (default: all)
resume [thread id(s)]     -- resume threads (default: all)
where [ | all] -- dump a thread's stack
wherei [ | all]-- dump a thread's stack, with pc info
up [n frames]             -- move up a thread's stack
down [n frames]           -- move down a thread's stack
kill     -- kill a thread with the given exception object
.
.
.
.
Startup commands can be placed in either "jdb.ini" or ".jdbrc"
in user.home or user.dir


List all threads in the system
> threads
Group system:
  (java.lang.ref.Reference$ReferenceHandler)0x153                        Reference Handler                                    cond. waiting
  (java.lang.ref.Finalizer$FinalizerThread)0x152                         Finalizer                                            cond. waiting
  (java.lang.Thread)0x151                                                Signal Dispatcher                                    running
Group main:
  (java.lang.Thread)0x1236                                               ContainerBackgroundProcessor[StandardEngine[Tomcat]] sleeping
  (org.springframework.boot.web.embedded.tomcat.TomcatWebServer$1)0x1241 container-0                                          sleeping
  (org.apache.tomcat.util.net.NioBlockingSelector$BlockPoller)0x13e7     NioBlockingSelector.BlockPoller-1                    running
  (org.apache.tomcat.util.threads.TaskThread)0x13f1                      http-nio-8080-exec-1                                 cond. waiting
  (org.apache.tomcat.util.threads.TaskThread)0x13f8                      http-nio-8080-exec-2                                 cond. waiting
  (org.apache.tomcat.util.threads.TaskThread)0x13f7                      http-nio-8080-exec-3                                 cond. waiting
  (org.apache.tomcat.util.threads.TaskThread)0x13f6                      http-nio-8080-exec-4                                 cond. waiting
  (org.apache.tomcat.util.threads.TaskThread)0x13f5                      http-nio-8080-exec-5                                 cond. waiting
  (org.apache.tomcat.util.threads.TaskThread)0x13f4                      http-nio-8080-exec-6                                 cond. waiting
  (org.apache.tomcat.util.threads.TaskThread)0x13f3                      http-nio-8080-exec-7                                 cond. waiting
  (org.apache.tomcat.util.threads.TaskThread)0x13f2                      http-nio-8080-exec-8                                 cond. waiting
  (org.apache.tomcat.util.threads.TaskThread)0x13fb                      http-nio-8080-exec-9                                 cond. waiting
  (org.apache.tomcat.util.threads.TaskThread)0x13fc                      http-nio-8080-exec-10                                cond. waiting
  (java.lang.Thread)0x13fd                                               http-nio-8080-ClientPoller-0                         running
  (java.lang.Thread)0x13ff                                               http-nio-8080-Acceptor-0                             running
  (java.lang.Thread)0x1402                                               http-nio-8080-AsyncTimeout                           sleeping
  (java.lang.Thread)0x141b                                               DestroyJavaVM                                        running
> 


Adding Breakpoint to the method
> stop at org.javahotfix.threading.controller.SomeController:21
Set breakpoint org.javahotfix.threading.controller.SomeController:21
>


Executing URL which will hit above the breakpoint
curl -G http://localhost:8080/somecontroller?operationCode=A


You will be notified with information, whenever the breakpoint got hit.
You can notice here, the previously prompt sign was > and now it is replaced with the thread name when the breakpoint got hits. This means now whatever operation you are going to perform that will be on executing on that particular thread and execution flow.
> 
Breakpoint hit: "thread=http-nio-8080-exec-1", org.javahotfix.threading.controller.SomeController.performOperation(), line=21 bci=0

http-nio-8080-exec-1[1] 


Printing Objects, Local Variables
You can print the instance variable, objects, local objects, local variable using dump and print command. You can print all local variable using locals command.
http-nio-8080-exec-1[1] dump requestCode
 requestCode = "A"
http-nio-8080-exec-1[1] 


http-nio-8080-exec-1[1] print requestCode
 requestCode = "A"
http-nio-8080-exec-1[1] 


http-nio-8080-exec-1[1] locals
Method arguments:
requestCode = "A"
Local variables:
http-nio-8080-exec-1[1] 


Know the location where are you currently
This command will print the stack trace of the current thread. using this you can identify where are you right now.
http-nio-8080-exec-1[1] where
  [1] org.javahotfix.threading.controller.SomeController.performOperation (SomeController.java:21)
  [2] sun.reflect.NativeMethodAccessorImpl.invoke0 (native method)
  [3] sun.reflect.NativeMethodAccessorImpl.invoke (NativeMethodAccessorImpl.java:62)
  [4] sun.reflect.DelegatingMethodAccessorImpl.invoke (DelegatingMethodAccessorImpl.java:43)
  [5] java.lang.reflect.Method.invoke (Method.java:498)
  [6] org.springframework.web.method.support.InvocableHandlerMethod.doInvoke (InvocableHandlerMethod.java:209)
  [7] org.springframework.web.method.support.InvocableHandlerMethod.invokeForRequest (InvocableHandlerMethod.java:136)
  [8] org.springframework.web.servlet.mvc.method.annotation.ServletInvocableHandlerMethod.invokeAndHandle (ServletInvocableHandlerMethod.java:102)
  [9] org.springframework.web.servlet.mvc.method.annotation.RequestMappingHandlerAdapter.invokeHandlerMethod (RequestMappingHandlerAdapter.java:891)
  [10] org.springframework.web.servlet.mvc.method.annotation.RequestMappingHandlerAdapter.handleInternal (RequestMappingHandlerAdapter.java:797)
  [11] org.springframework.web.servlet.mvc.method.AbstractHandlerMethodAdapter.handle (AbstractHandlerMethodAdapter.java:87)

  [47] org.apache.coyote.http11.Http11Processor.service (Http11Processor.java:800)
  [48] org.apache.coyote.AbstractProcessorLight.process (AbstractProcessorLight.java:66)
  [49] org.apache.coyote.AbstractProtocol$ConnectionHandler.process (AbstractProtocol.java:806)
  [50] org.apache.tomcat.util.net.NioEndpoint$SocketProcessor.doRun (NioEndpoint.java:1,498)
  [51] org.apache.tomcat.util.net.SocketProcessorBase.run (SocketProcessorBase.java:49)
  [52] java.util.concurrent.ThreadPoolExecutor.runWorker (ThreadPoolExecutor.java:1,142)
  [53] java.util.concurrent.ThreadPoolExecutor$Worker.run (ThreadPoolExecutor.java:617)
  [54] org.apache.tomcat.util.threads.TaskThread$WrappingRunnable.run (TaskThread.java:61)
  [55] java.lang.Thread.run (Thread.java:745)


Expression Evaluation
Using the eval function, you can evaluate all the expression inside the context of the thread.
http-nio-8080-exec-1[1] eval requestCode == "A"    
 requestCode == "A" = false
http-nio-8080-exec-1[1] eval requestCode.equals("A");
 requestCode.equals("A"); = true
http-nio-8080-exec-1[1] 


Assigning Values
You can use the set command to assign new values to the variable while runtime.
http-nio-8080-exec-1[1] dump requestCode
 requestCode = "A"
http-nio-8080-exec-1[1] set requestCode = "B"   
 requestCode = "B" = "B"
http-nio-8080-exec-1[1] dump requestCode
 requestCode = "B"
http-nio-8080-exec-1[1] 


Execute the current line and move to the next line
This function will execute the current line and move the cursor to next line, if your current line has another function, call, it will go inside the function call. if you want to step over the line you can use next command.
http-nio-8080-exec-1[1] step
Step completed: "thread=http-nio-8080-exec-1", org.javahotfix.threading.controller.SomeController.performOperation(), line=24 bci=2

http-nio-8080-exec-1[1] http-nio-8080-exec-1[1] locals
Method arguments:
requestCode = "B"
Local variables:
timeDuration = 0
http-nio-8080-exec-1[1]


http-nio-8080-exec-1[1] step
> 
Step completed: "thread=http-nio-8080-exec-1", org.javahotfix.threading.controller.SomeController.getSomeServiceBean(), line=54 bci=0

http-nio-8080-exec-1[1] locals
No local variables
http-nio-8080-exec-1[1] 


Step Up and move to the caller of the function
This command will step up the execution to 1 level up so as it will reach to the caller of the function. 
http-nio-8080-exec-1[1] step up
> 
Step completed: "thread=http-nio-8080-exec-1", org.javahotfix.threading.controller.SomeController.performOperation(), line=30 bci=158

http-nio-8080-exec-1[1] 


Continue the execution by release hold thread by the debugger
This command will release the thread holder by the debugger, and continue its remaining execution.
http-nio-8080-exec-1[1] cont
> 


Clear will be used to release the breakpoint
This command will list all the breakpoints marked when executed without parameters. You can pass breakpoint location as a parameter to this command, this will clear the breakpoint being triggered in subsequent flows.
> clear
Breakpoints set:
 breakpoint org.javahotfix.threading.controller.SomeController:21
> clear org.javahotfix.threading.controller.SomeController:21
Removed: breakpoint org.javahotfix.threading.controller.SomeController:21
> 


Exit to the debugger console
This command will exit the debugger console, and detach the debugger to the remote application. 
> exit
[root@localhost anilsable]# 


So that's all for this tutorials friends, I hope you like these tutorials. Please provide your feedback, suggestion & queries in below comment box.

Till then goodbye
Happy Coding & have a wonderful day


Thursday, March 14, 2019

Spring Boot Micro services - tmp/tomcat working directory gets deleted & unable to perform any multi part upload


Hello friends, Today in this blog we will talk on the below error, which might occur within your Spring boot application.


2019-03-13 00:56:34.824 ERROR 3061 --- [nio-8080-exec-9] o.a.c.c.C.[.[.[/].[dispatcherServlet]    : 
Servlet.service() for servlet [dispatcherServlet] in context with path [] threw exception [Request 
processing failed; nested exception is org.springframework.web.multipart.MultipartException: Failed 
to parse multipart servlet request; nested exception is java.io.IOException: The temporary upload 
location [/tmp/tomcat.8182395428229892866.8080/work/Tomcat/localhost/ROOT] is not valid] with root cause

java.io.IOException: The temporary upload location [/tmp/tomcat.8182395428229892866.8080/work/Tomcat/localhost/ROOT] is not valid
 at org.apache.catalina.connector.Request.parseParts(Request.java:2877) ~[tomcat-embed-core-8.5.34.jar!/:8.5.34]
 at org.apache.catalina.connector.Request.parseParameters(Request.java:3242) ~[tomcat-embed-core-8.5.34.jar!/:8.5.34]
 at org.apache.catalina.connector.Request.getParameter(Request.java:1136) ~[tomcat-embed-core-8.5.34.jar!/:8.5.34]
 at org.apache.catalina.connector.RequestFacade.getParameter(RequestFacade.java:381) ~[tomcat-embed-core-8.5.34.jar!/:8.5.34]
 at org.springframework.web.filter.HiddenHttpMethodFilter.doFilterInternal(HiddenHttpMethodFilter.java:84) ~[spring-web-5.0.9.RELEASE.jar!/:5.0.9.RELEASE]
 at org.springframework.web.filter.OncePerRequestFilter.doFilter(OncePerRequestFilter.java:107) ~[spring-web-5.0.9.RELEASE.jar!/:5.0.9.RELEASE]
 at org.apache.catalina.core.ApplicationFilterChain.internalDoFilter(ApplicationFilterChain.java:193) ~[tomcat-embed-core-8.5.34.jar!/:8.5.34]
 at org.apache.catalina.core.ApplicationFilterChain.doFilter(ApplicationFilterChain.java:166) ~[tomcat-embed-core-8.5.34.jar!/:8.5.34]


If your spring boot application deals with the multipart request, and there are no multipart request from last 10 days (default value for most of Linux) then your Linux operating system deletes the tomcat working directory as part of tmp directory cleanup activity.

So what is the solution to this problem

  • Use the alternate directory for storing temp files using property "java.io.tmpdir"
  • Configure "tmpwatch" process to ignore the tomcat folder for cleanup

You must be familiar with the first approach i.e. setting the java.io.tmpdir property to the location, where you know that no other process will clean up this location. You can clean up this location in your application startup/shutdown scripts to ensure that no stale directory be there longer. You can pass the -Djava.io.tmpdir=/var/tmp Parameter while running your application


Let's discuss the second approach.
Here in this approach, we are adding configuration in the tmpwatch configuration file to tell the process to ignore the /tmp/tomcat* folders. The tmpwatch configuration location will be at /etc/cron.daily/tmpwatch.

File look like below
flags=-umc
/usr/sbin/tmpwatch "$flags" -x /tmp/.X11-unix -x /tmp/.XIM-unix \
         -x /tmp/.font-unix -x /tmp/.ICE-unix -x /tmp/.Test-unix \
         -X '/tmp/hsperfdata_*' -X '/tmp/.hdb*lock' \
         -X '/tmp/.sapstartsrv*.log' \
         -X '/tmp/pymp-*' 10d /tmp
/usr/sbin/tmpwatch "$flags" 30d /var/tmp
for d in /var/{cache/man,catman}/{cat?,X11R6/cat?,local/cat?}; do
     if [ -d "$d" ]; then
         /usr/sbin/tmpwatch "$flags" -f 30d "$d"
     fi
done

You need to add the tomcat folder in the above file. So that whenever the tmpwatch process runs, it should ignore the tomcat folder for deletion.

Here is the modified file. Please, note that we have used -X & not -x. Both tell the process to exclude the specified directory from deletion. Using -X we can give a directory path with wildcard characters but with -x we can only give fixed path.

flags=-umc
/usr/sbin/tmpwatch "$flags" -x /tmp/.X11-unix -x /tmp/.XIM-unix \
         -x /tmp/.font-unix -x /tmp/.ICE-unix -x /tmp/.Test-unix \
         -X '/tmp/hsperfdata_*' -X '/tmp/.hdb*lock' \
         -X '/tmp/.sapstartsrv*.log' \
         -X '/tmp/tomcat* \
         -X '/tmp/pymp-*' 10d /tmp
/usr/sbin/tmpwatch "$flags" 30d /var/tmp
for d in /var/{cache/man,catman}/{cat?,X11R6/cat?,local/cat?}; do
     if [ -d "$d" ]; then
         /usr/sbin/tmpwatch "$flags" -f 30d "$d"
     fi
done


So that's all for this blog I hope you have understood both approaches. If you have any question, suggestion please let us know in the comment box below. I will definitely try to answer your question or consider your suggestion to improve my blogs.

Thanks
Have a wonderful day & Happy Coding !!!

Friday, March 8, 2019

Java verbose option with its usage


Hello  Friends, Welcome back to my blog. Today our topic for this blogs is to understand one of the parameter called "verbose" that we can pass to the java while running your application. As from the parameter name we can guess that it means to have information in details. But how and which cases we should use this, let's have a look.

We have 3 verbose parameters as below

  • verbose:class
  • verbose:gc
  • verbose:jni

Let's understand each of them in detail.

verbose:class
This parameter output the information about which classes are loaded and from which jar. You can use this parameter to identify when you have multiple jars on the classpath, and some of the jars are having to contradict package structure with the same class name. You won't recognize from which jar the class is loaded. you can enable verbose option with class level to get those details. This option can also be helpful in case of the custom class loader where your classes are loaded by the custom classloader based on certain condition so in this case, you won't be able to figure out which class is loaded so this parameter can help you in this case. Let's look at the sample code.

Program:
package org.javahotfix.blog.application;

import java.util.Date;
import com.google.gson.Gson;
import com.google.gson.GsonBuilder;

public class MyJavaApplication {

 public static void main(String args[]) {
 
  MyJavaBlog blog = new MyJavaBlog();
  blog.setId("blog-1");
  blog.setName("java verbose options in detail");
  blog.setCreatedOn(new Date());
  blog.setLastModifiedOn(new Date());
  
  GsonBuilder gb = new GsonBuilder().setPrettyPrinting();
  Gson gson = gb.create();
  
  String jsonString = gson.toJson(blog);
  System.out.println(jsonString);
 }
}

Output :
I:\Workspace\test-gradle-application\bin>java -verbose:class -cp C:/Users/Anil/.gradle/caches/modules-2/files-2.1/com.google.code.gson/gson/2.8.5/f645ed69d59
5b24d4cf8b3fbb64cc505bede8829/gson-2.8.5.jar;. org.javahotfix.blog.application.MyJavaApplication

[Opened C:\Program Files\Java\jre8\lib\rt.jar]
[Loaded java.lang.Object from C:\Program Files\Java\jre8\lib\rt.jar]
[Loaded java.io.Serializable from C:\Program Files\Java\jre8\lib\rt.jar]
[Loaded java.lang.Comparable from C:\Program Files\Java\jre8\lib\rt.jar]
[Loaded java.lang.CharSequence from C:\Program Files\Java\jre8\lib\rt.jar]
[Loaded java.lang.String from C:\Program Files\Java\jre8\lib\rt.jar]
[Loaded java.lang.reflect.AnnotatedElement from C:\Program Files\Java\jre8\lib\rt.jar]
[Loaded java.lang.reflect.GenericDeclaration from C:\Program Files\Java\jre8\lib\rt.jar]
[Loaded java.sql.Date from C:\Program Files\Java\jre8\lib\rt.jar]
[Loaded com.google.gson.internal.bind.JsonAdapterAnnotationTypeAdapterFactory from file:/C:/Users/Anil/.gradle/caches/modules-2/files-2.1/com.google.code.gson/gson/2.8.5/f645ed69d595b24d4cf8b3fbb64cc505bede8829/gson-2.8.5.jar]
[Loaded com.google.gson.internal.bind.TreeTypeAdapter from file:/C:/Users/Anil/.gradle/caches/modules-2/files-2.1/com.google.code.gson/gson/2.8.5/f645ed69d595b24d4cf8b3fbb64cc505bede8829/gson-2.8.5.jar]
.
.
.
.
{
  "id": "blog-1",
  "name": "java verbose options in detail",
  "createdOn": "Mar 8, 2019 12:59:47 AM",
  "lastModifiedOn": "Mar 8, 2019 12:59:47 AM"
}
[Loaded java.lang.Shutdown from C:\Program Files\Java\jre8\lib\rt.jar]
[Loaded java.lang.Shutdown$Lock from C:\Program Files\Java\jre8\lib\rt.jar]


verbose:jni
Before starting with this parameter, let understand what is JNI. Java Native Interface is API in Java which allows it to communicate with the underlying operating system like interacting with hardware, executing operating system routine, executing programs on the operating system. verbose option with jni will output all the calls to the operating system. instead, we can say all the java native method execution. Let see below program which is running on windows and calling existing program installed on the operating system.

Program:
package org.javahotfix.blog.application;

import java.io.IOException;

public class JNIDemo {
 public static void main(String args[]) throws InterruptedException, IOException {
  System.out.println("============= My Application code started =========================");  
  Process p = Runtime.getRuntime().exec("gm -version");
  while(p.isAlive()) {
   Thread.currentThread().sleep(1000);
  }
  int exit = p.exitValue();
  System.out.println("Exit Value : " + exit);
  System.out.println("============= My Application code ended =========================");
 }
}

Output:
I:\gitech\Java\Workspace\test-gradle-application\bin>java -verbose:jni org.javahotfix.blog.application.JNIDemo
[Dynamic-linking native method java.lang.Object.registerNatives ... JNI]
[Registering JNI native method java.lang.Object.hashCode]
[Registering JNI native method java.lang.Object.wait]
[Registering JNI native method java.lang.Object.notify]
[Registering JNI native method java.lang.Object.notifyAll]
[Registering JNI native method java.lang.Object.clone]
.
.
.
============= My Application code started =========================
[Dynamic-linking native method java.lang.ProcessImpl.getStillActive ... JNI]
[Dynamic-linking native method java.lang.ProcessEnvironment.environmentBlock ... JNI]
[Dynamic-linking native method java.lang.ProcessImpl.create ... JNI]
[Dynamic-linking native method java.lang.ProcessImpl.isProcessAlive ... JNI]
[Dynamic-linking native method java.lang.ProcessImpl.getExitCodeProcess ... JNI]
Exit Value : 0
============= My Application code ended =========================


verbose:gc
This option will print the garbage collection invocation details to the stdout. It will be good if we get it logged in to the file. this file then can be analyzed by the memory analyzer tools which can help us to finetune the GC settings on the JVM. there are many tools in the market which analyze the GC logs and help to fine-tune the GC settings. I would recommend using the -XX:+PrintGCTimeStamps -XX:+PrintGCDetails with it so it will print the timestamp and summery. when we enable it looks like below.

Output
I:\Workspace\test-gradle-application\bin>java -verbose:gc -XX:+PrintGCTimeStamps -XX:+PrintGCDetails  -cp C:/Users/Anil/.gradle/caches/modules-2/files-2.1/co
m.google.code.gson/gson/2.8.5/f645ed69d595b24d4cf8b3fbb64cc505bede8829/gson-2.8.5.jar;. org.javahotfix.blog.application.MyJavaApplication
0.224: [GC (Allocation Failure) [PSYoungGen: 512K->496K(1024K)] 512K->504K(62976K), 0.0075313 secs] [Times: user=0.00 sys=0.00, real=0.02 secs]
0.314: [GC (Allocation Failure) [PSYoungGen: 993K->480K(1536K)] 1001K->597K(63488K), 0.0037784 secs] [Times: user=0.00 sys=0.00, real=0.00 secs]
0.428: [GC (Allocation Failure) [PSYoungGen: 1504K->496K(1536K)] 1621K->878K(63488K), 0.0043473 secs] [Times: user=0.00 sys=0.00, real=0.01 secs]
0.614: [GC (Allocation Failure) [PSYoungGen: 1520K->496K(2560K)] 1902K->1208K(64512K), 0.0053639 secs] [Times: user=0.00 sys=0.00, real=0.00 secs]
{
  "id": "blog-1",
  "name": "java verbose options in detail",
  "createdOn": "Mar 8, 2019 1:24:52 AM",
  "lastModifiedOn": "Mar 8, 2019 1:24:52 AM"
}
Heap
 PSYoungGen      total 2560K, used 550K [0x00000000ebd80000, 0x00000000ec080000, 0x0000000100000000)
  eden space 2048K, 2% used [0x00000000ebd80000,0x00000000ebd8da60,0x00000000ebf80000)
  from space 512K, 96% used [0x00000000ec000000,0x00000000ec07c010,0x00000000ec080000)
  to   space 512K, 0% used [0x00000000ebf80000,0x00000000ebf80000,0x00000000ec000000)
 ParOldGen       total 61952K, used 712K [0x00000000c3800000, 0x00000000c7480000, 0x00000000ebd80000)
  object space 61952K, 1% used [0x00000000c3800000,0x00000000c38b2078,0x00000000c7480000)
 Metaspace       used 4372K, capacity 5024K, committed 5248K, reserved 1056768K
  class space    used 506K, capacity 528K, committed 640K, reserved 1048576K

I:\gitech\Java\Workspace\test-gradle-application\bin>


Ok, that's all for this blogs friends if you have any comments suggestion please feel free to comment. i will definatly try to answer your query or consider you suggestion and try to improve my blogs.

Thanks
Happy coding and have a wonderful day

Tuesday, March 5, 2019

Understanding Strings in Java


Hello Friends, Welcome to my blog. A Blog which shares the deep secrets inside the java and presents it in front of you so you can understand the concept easily and can accommodate it in your professional life.

Introduction
Today's topic is the strings in java. Strings are the immutable objects in java. Once it is created it cannot be changed. if one needs to change the string, java creates new strings for you. At the core, java manages a pool of Strings. Whenever anyone requests to store the string, java first checks the existence of that string in the pool, if it is there simply it returns the reference object of that string to the caller.

One might ask why is so! Java is using the concept of "String interning". It is a method of storing only one copy of each distinct string. this will allow the runtime to save memory. String interning is an example of "Flyweight pattern" software design pattern.

I hope you are a clear idea now about the strings in java so let's get our hand dirty with programming and take our application to the operation theater and scissors it with the heap dump. If you are a newbie to the heap dump refer my blog here. I have added a breakpoint at the last sentence and in this way I have captured the heap dump of my application.

Let's take below example.


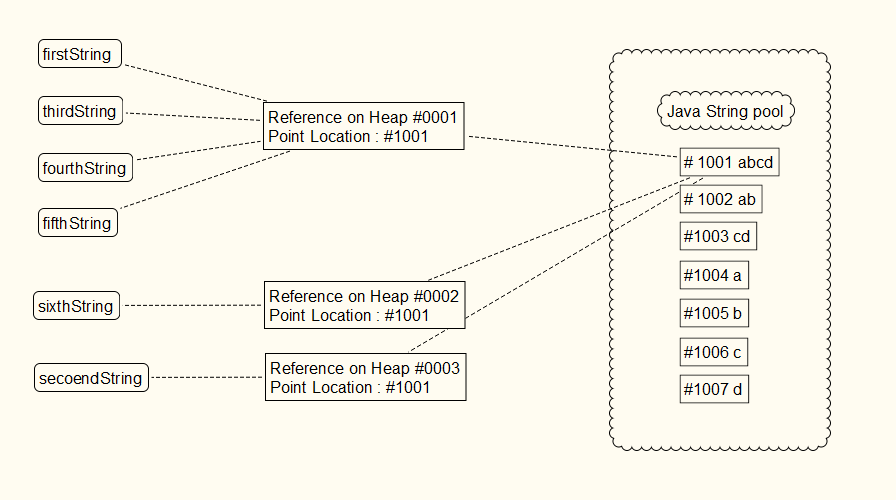
In the above application, We have created 6 strings each of them store the "abcd" value in different ways. some store directly, while others are doing the concatenation. But as the string interning method, only one instance of "abcd" is stored. Let's discuss each step in detail


  • on the line #9 first string is initialized with string "abcd, As of now string pool doesn't consist this string so java initially put this string in the pool & return the reference to the user.
  • on the line #11 third string is initialized with the concatenation of "ab" and "cd". Here java stores the "ab" and "cd" string in the string pool, concat them and found that result already exist in the pool. so instade of creating new string, it return the referece to it. so now the first variable and third variable are pointing to the same value with the same reference variable.
  • on the line #12 same is happened, all the 4 string stored in the string pool. java does concatenation on them and found that the result is already there in the pool. it returns the reference to the value.
  • on line #13 same is happened as above. till now first, third, fourth and fifth variables are pointing to the same value with the same reference variable.
  • on line #10 and #14, we have used a new operator. but still, the principle will not change for the string interning. here the second and sixth variable will point to the same value but having distinct reference variable.

Above steps can be understood by below screenshot


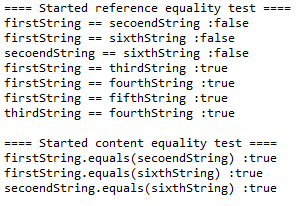
Here is the output of the program

I Hope you have a clear understanding of the comparison operator and the equals method. if not here is the few words can help you. comparison operator "==" when used on the objects (not on primitive) it compares the reference variable; do they are same or not. here firstString, thirdString and fourthString are having same reference variable. but the firstString, secoendString, and sixth string are having different reference variable (although they point to the same value, the variable will refer to different pointers stored on a different location) . as opposite the equals method will compare the actual content present in the variable.

Below are the few footprints when we open the heap dump of the application. if you see below image, you will come to know that first, third, fourth and fifth variables are having same reference #1662. however, the second variable is having reference #1663 and the sixth variable is having reference #1664. but in the end, all of them are having a value "abcd" which is located on location #1683.

Refer below screenshot for heap dump instance view.


Each of the variable after expanding their properties


So that's all friend hope you have understood the immutable nature of the string and how java store the string. if you have any question please comment below. your feedback is also valuable to improve my future blogs. do share it!

Happy Coding & Have a wonderful day.
-Anil Sable

Saturday, March 2, 2019

How to take java thread dump on windows, Linux & Other Operating System


Hello Friends, Today in this blog we will be learning how to take a thread dump on Windows and Linux Operating System. We can take a Thread dump of a local running process or remotely running process. If you already have a thread dump and just looking for the information to analyze then you can refer my blog here

Let's get started then.


Capturing Thread dump of Local Running Process on Linux Operating System
We will be using kill command here, This is the most popular command in Linux to send a different kind of signals to the process. this command is only available on Linux and not on windows. We have to send the SIGQUIT signal and the process id with this command. To learn different Linux kill command signals check out here. refer below steps.

1. Identify the process id of the java application for which we want to take a thread dump. You can use the ps command to list all process & grep the java keyword.
Command: $ ps -ef | grep "java"
Example:

2. use the "Kill -3" command followed by process id which will take a thread dump of the process and put it to STDOUT of the application. Here -3 is equivalent to send SIGQUIT signal to the process.
Command: $ kill -3 <PID>
Example:


Capturing Thread dump of Local Running Process on Windows or Other Operating System
We will be using jstack & jps command here. this command ships with your JDK installation bundle and present in the bin directory of the JDK. You can use this command on Linux as well as Windows & Other Operating system. before running these commands ensure JDK bin directory is added to the PATH environment variable. below are the steps

1. Identify the java process id for which you want to take a thread dump. for this, you can use jps command. Executing this command will list the all running java application. You need process id from the output list.


2. Now we know the process id, use the jstack command to print the thread dump on the console.


3. You can redirect output to separate text file which will be easy to maintain & process by thread dump analyzer tools.


Capturing a thread dump of remotely running java process
In this technique, we don't have to ssh or log in to the remote system. We have to enable the JMX Monitoring on our java application before running. When we enable this functionality, java application opens a port over which many things can be carried out. like statics of the application, thread dump, heap dump. You can read more about this here


Using GUI Tools for Thread dump and other monitoring tasks
JDK provides 2 GUI tools for application monitoring. both ship with JDK bundle & present in the bin directory of the JDK. "JConsole" is one tool from you can see the live thread stack trace. you can use this tool on Linux as well as on Windows for the locally running or remotely running java process. Below are the few features provided by this tool
  • View Memory Status
  • View MBeans
  • View Stack trace of a thread
  • VM Status

For remotely running process you need to enable JMX Port on the process.


 JConsole Tool

There is another tool called "JVisualVM", this tool will give you more insights than "JConsole". Few features of this tool are listed below.

  • Take Thread Dump
  • Take Heap Dump
  • Check Heap memory status
  • View stack trace of a thread
  • Ask JVM to invoke GC
  • Check CPU Usage
  • Analyze Heap dump
  • Sampler 
  • Profiling 


That's all for this tutorial friends. Please let me know your comments, questions or suggestion in below comment box, I will definitely try to improve the content and resolve your queries.

Thursday, February 21, 2019

Find out latency increase issue while performance test, take java thread dump and analyze it


Hello Friends in this blog we will be learning how to analyze thread saturation. if your application facing latency issue on load/performance test you should read this article.   

Background of the Problem Statement 
In a large complex java application, it happens many times that few operations run well when running in isolation. But the Latency of the calls increases during performance/load test. This might be happening due to the poor design of the multithreaded system. Below are the few signs which might cause slowness/increase latency to your application calls & this may vary depending on the system. am listing out the generic problem which everyone might encounter.
  • Excessive use of synchronization with improper lock objects
  • Connect to an external system, where the external system does not guarantee immediate response
  • Executing expensive SQL Queries / Using non-indexed columns on the OLTP system
  • Configuring the low number of thread pool & request incoming rate is too high, we can say as thread tuning is not well


How Multithreaded system works
Before we understand the problem in depth, let us understand how multi-threaded system work. Let us take an example of apache tomcat web server. each application server has a thread pool. it has a finite number of threads are defined like 50 or 80 or 100. whenever a request comes into the system, a corresponding job is added to the queue. job scheduler/thread manager check for free thread & assign the job to the thread for execution. and in this way, the job gets on to his journey of serving your request. Here below image depict the picture of what we discussed just now

Ultimately now the job for fetching employee details of id 1234, will assign to thread "Thread #1" as it is an ideal state & ready to work. remaining threads are currently working on another task. so they cannot take other tasks they get freed.

Let's get back to our problem statement
So now you have understood, how the multithreaded system works, you can imagine what can happen if all threads are currently working/running state & constantly new jobs are coming into the system. what will happen in this case? All new job will be queued up. as in when thread frees from their existing task, it will pick up a job from the waiting queue. this will impact the execution time of the request. so now the caller will have to wait till the job was in queue + actual job execution time. in this way, latency gets increased. So now we have understood that queuing up jobs will cause latency increase. Thread execution time should be finitely based on what type of system you are designing & what level of TPS you want to archive from your system. let us see some scenario that one should avoid, which cause the long-running operation execution on the thread. 

So now you have aware of what to do and what not. But how will you identify the problem the in the large complex application if you face increasing latency, slowness problem under load or performance test? 

Just to simulate the latency, I have developed the sample spring boot application which we will be used to identify the problem. I have developed this application just to simulate the thread saturation. It is having "thread.sleep()" statement to simulate latency by external calls or heavy database query.


We run the demo application, & hit the load test using SOAP UI tool. In below screenshot, you can see the which operation is in progress & how many time it is taking.


Here is the statics of SOAP UI Load test. You can see the latency of the request min, max, and average.


So at this point, we are ready to take the thread dump. Our performance test is already running & in SOAP UI test we have already seen that our threads are getting saturated & latency is increasing for the REST calls. I will show how we can take thread dump on Windows & Linux operating systems. 

How to take a thread dump and analyze it 

1. For taking a thread dump of the java process, JDK has provided few commands in the bin directory. make sure you have updated the PATH variable to include java bin directory. otherwise you are in the bin directory of JDK.


2. For taking thread dump, you should know for which java process you want to take a thread dump. JDK has provided "jps" command to list the java process. below is the sample execution of the command. am executing command -v option which will give me more verbose details about the process. and anyone can distinguish between the different Java process running simultaneously under one JVM. If you are on Linux you can use ps -ef | grep "java" to list all java process. in below screenshot, you can see sample java application is running with process id PID 31684.


3. Now we have found the java process for which we have to take the thread dump. You can use "jstack" command with process id and redirect the output to the file. if you are the linux user you can use kill -3 <<PID>> command to send the signal to java process which will dump the thread dump on stdout.


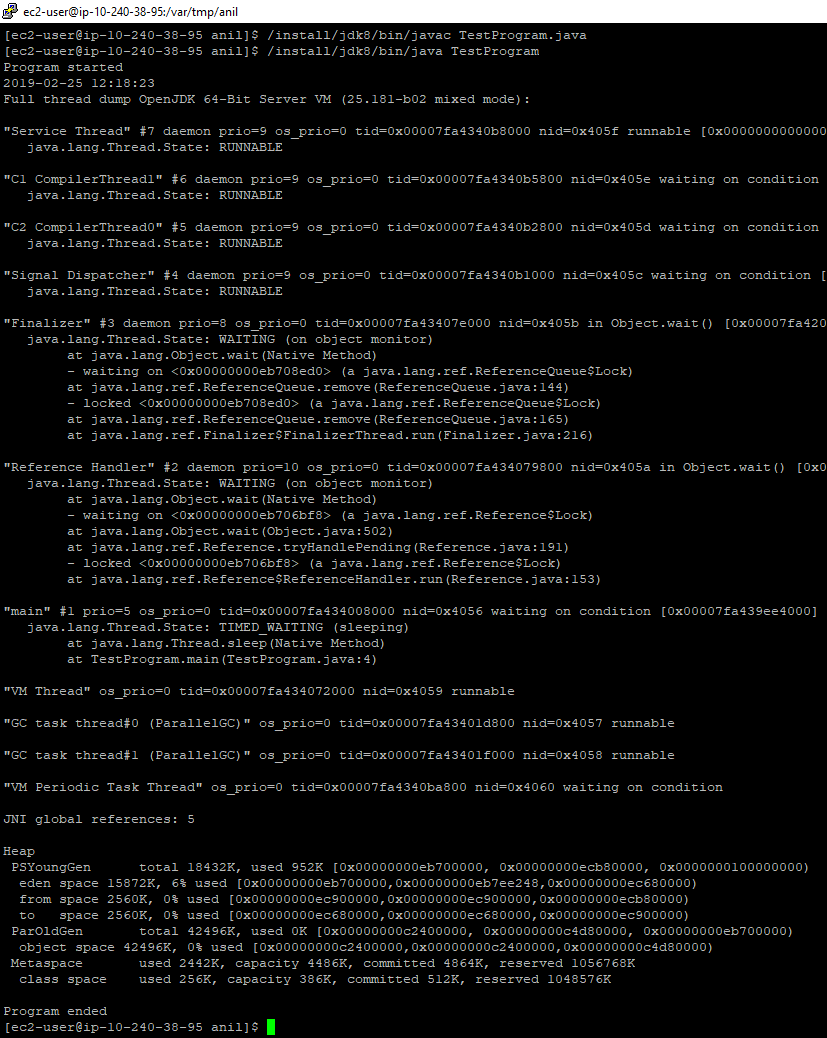
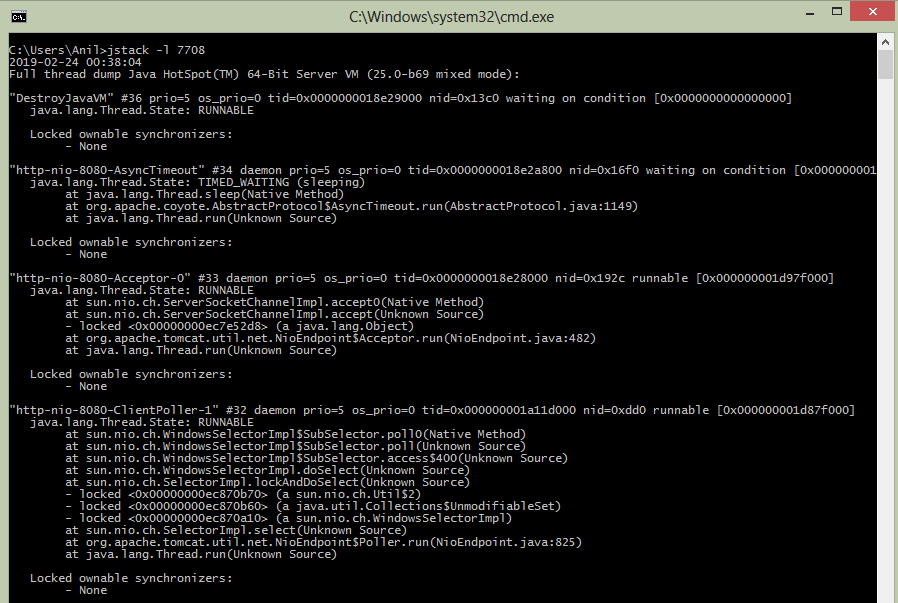
4. Now you have a thread dump file. a Thread dump file is a simple text file in which state of each thread is dumped with its call stack. there is various information associated with it like thread name, is it a demon thread, thread priority in JVM, thread priority in os, os transaction id, thread state, monitor. below is the screenshot of the thread dump file.


5. Now you have a thread dump file. there are many free tools which can analyze your thread dump and tell you what's wrong with your application. you can google for thread dump analyzer you will get a bunch of results which can analyze your thread dump. One of my favorites is fastthread.io. This website will give you the graphical representation of your thread dump. Let's analyze the result.


6. Open up the website and upload your dump file there. hit the analyze button. You can upload multiple thread dump file here.


7. Once processing is complete. you will see the report in the format of graphs and text. below is the sample report. Here in the below report, it is mention that analyzer has found the problem. 


Below 9 threads were blocked. you will get a nice description of the problematic scenario


Above image indicate that thread-8 has obtained a lock and did not release and due to this other threads are waiting. you can click on each thread to check in the call stack at what point they are blocked.


In this way, we can analyze the thread dump and can get rid of the problematic coding path.